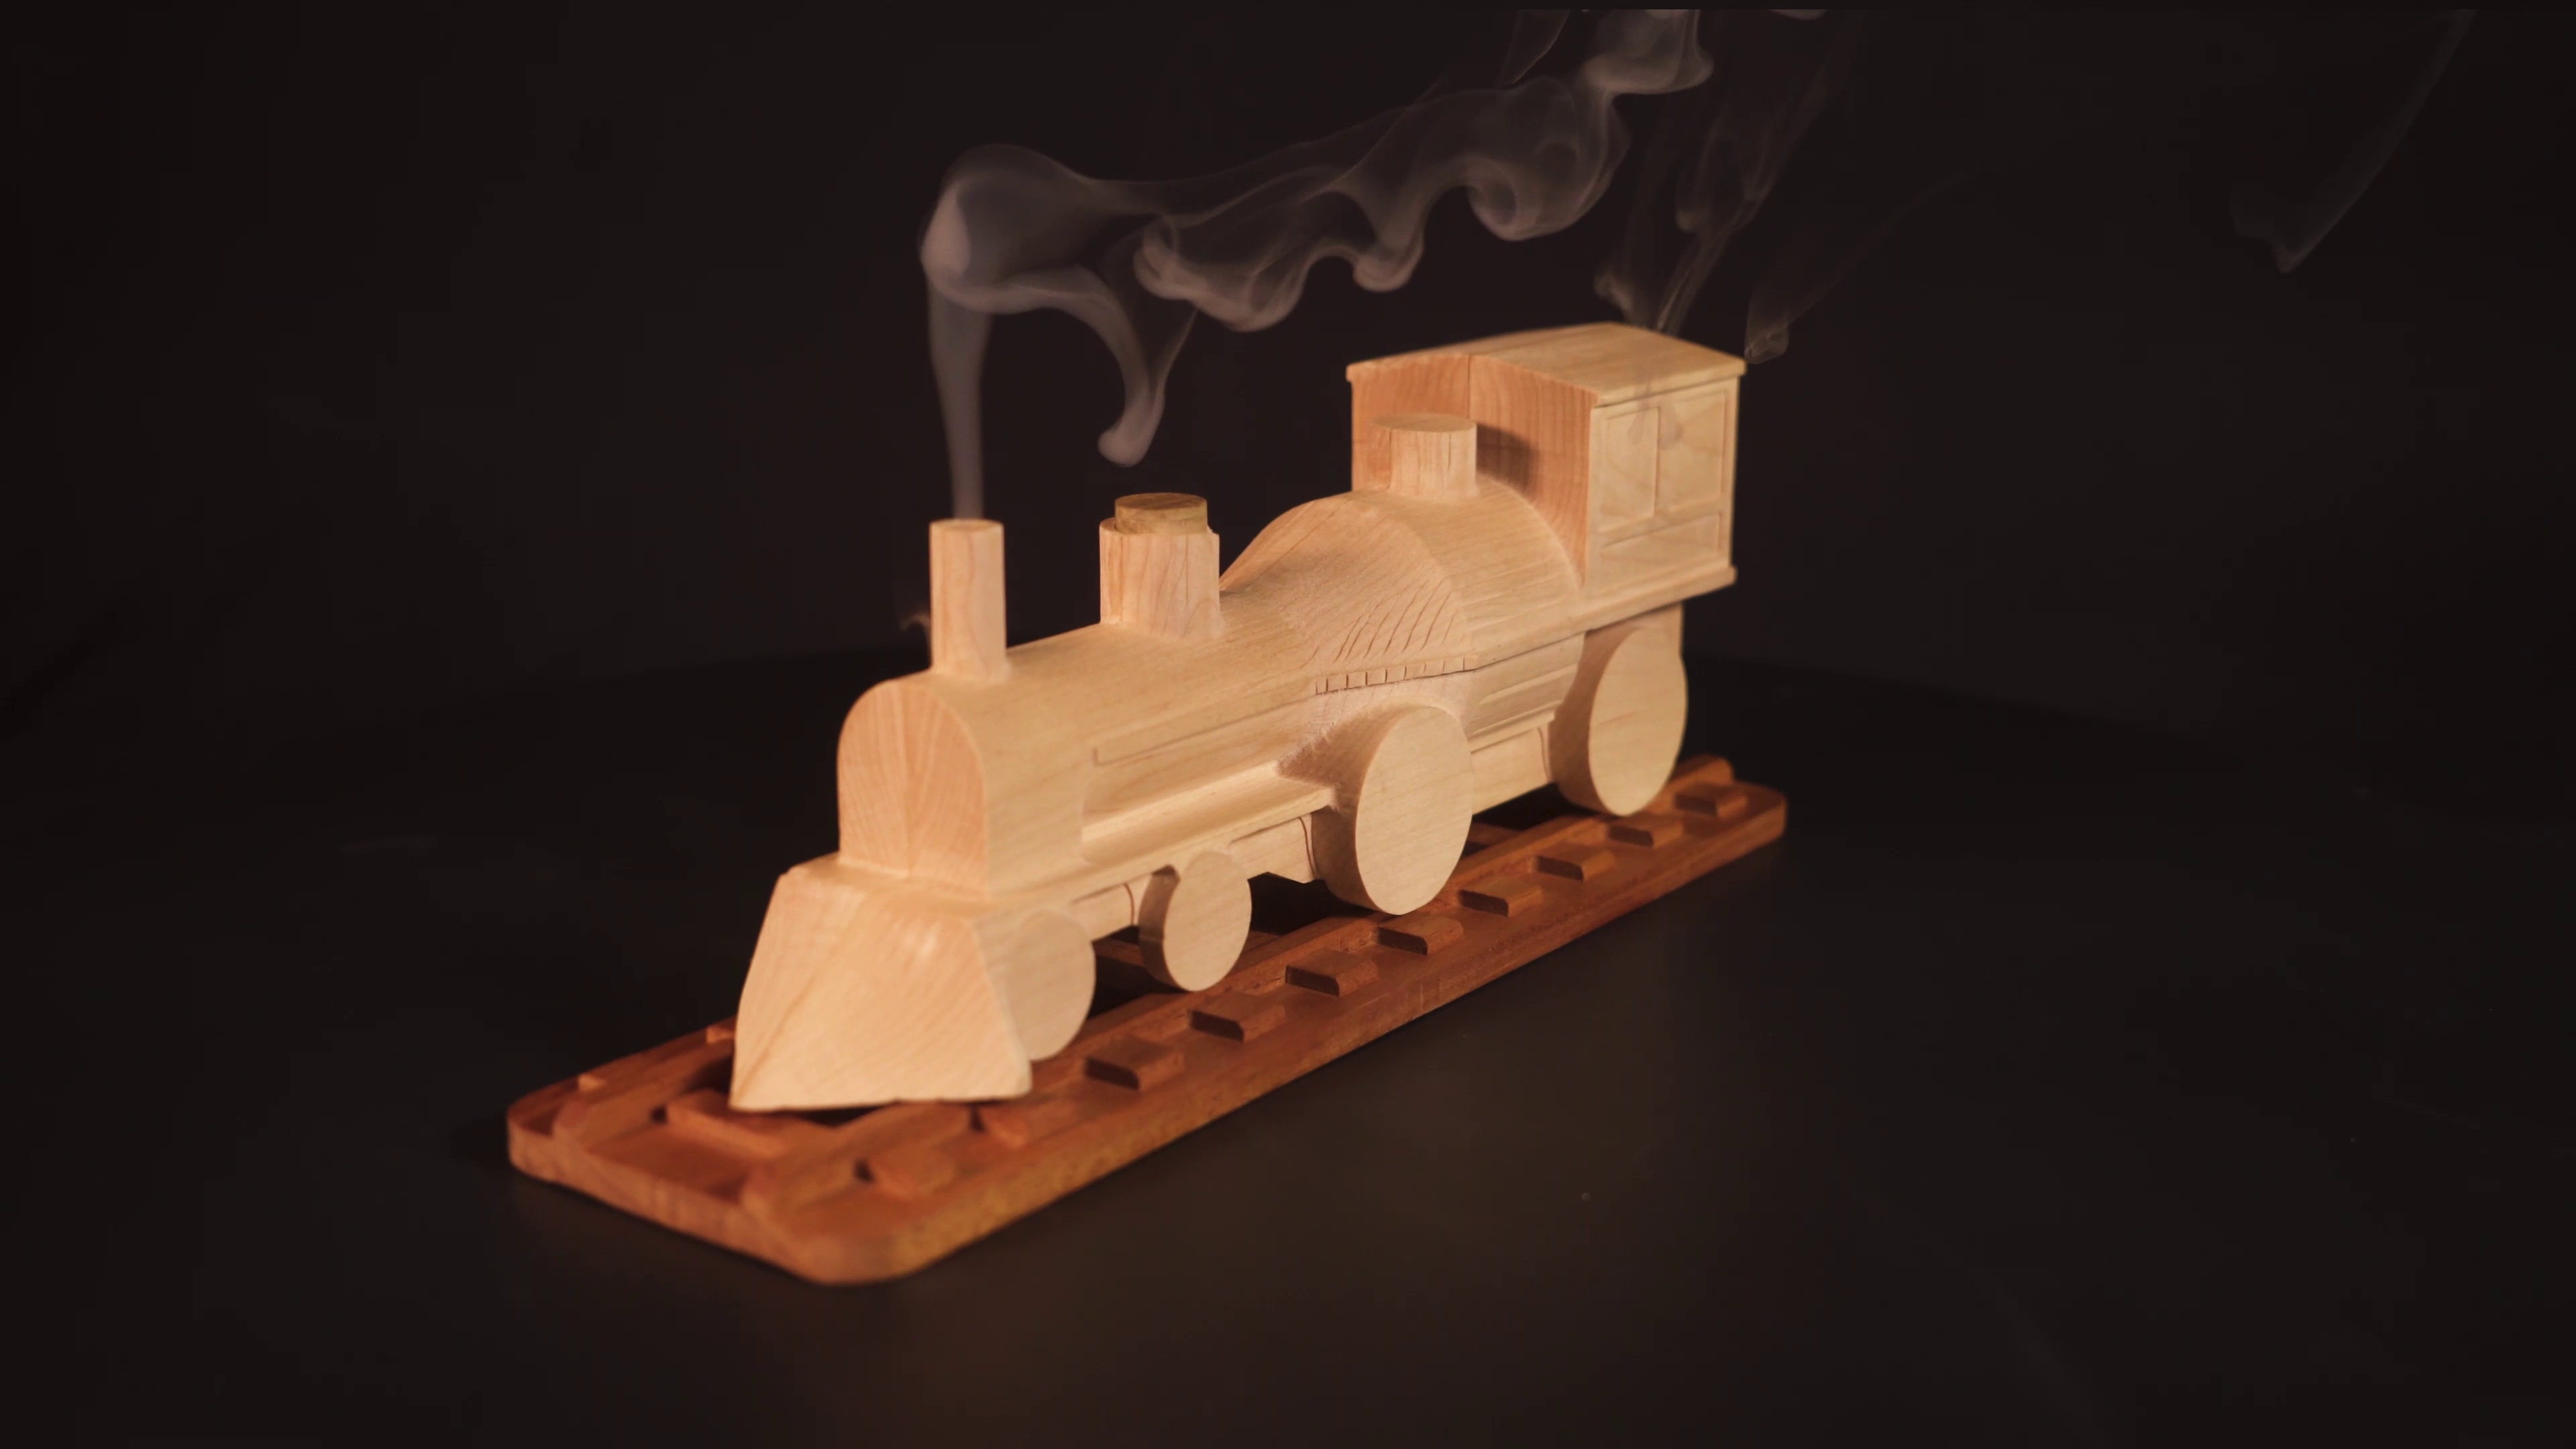
I've always found the smell of incense calming, but that's not usually the reason I ignite sticks. My favorite part of the experience is watching the smoke as it rises and cools through the air, showing the invisible eddy currents and vortices happening in the air all around us. What a beautiful demonstration of fluid mechanics! In February 2021, I had the idea to make an incense holder specifically designed to showcase the rising smoke. I considered several ideas, before finally deciding on an old-fashioned steam locomotive.
At the time, I had just taken a virtual offering of a fluids course. I drew inspiration from what I had learned about boundary layer effects and flow behavior to design a mechanism that could blow smoke rings at the press of a button. During the pandemic, I spent the money that I would have spent on rent on a CNC router, so I could work on projects while enrolled in remote classes. I used the machine to turn several pieces of hardwood into a fully functioning incense locomotive. I made a video documenting the entire process, from design to completion, which you can watch below.
I was a complete novice to CNC machining and operation when I took on this project. I figured that the best way to learn would be to dive in headfirst with a project on the edge of my comfort zone. I ran into many unexpected issues with my machining strategy and design, so I ended up having to restart a number of times, but I learned more about manufacturing with each one.
There were several factors I considered when designing this train. I had two key objectives to accomplish within the design. I wanted the incense smoke to rise through the smoke stack of the train, and I wanted the train to blow smoke rings at the press of a button. To route the smoke where I wanted, I realized that I couldn't use the stick incense that I was most familiar with, as these sticks are too large to fit within the form factor I wanted. Instead, I researched cone incense, which I learned come in primarily two types: backflow cones and regular cones. Backflow cones were no good, because they were hollow and cooled the smoke through their design, causing it to fall rather than rise. I designed the mechanism to work around normal incense cones.

The inside of the train has two chambers: a primary chimney and a connected inlet from a custom air piston. The air piston is spring-loaded, and launches a blast of air through the chimney to combine with the smoke from the incense cone. This blast of relatively high pressure air carries smoke through the chimney, where the narrowing outlet creates a slower-moving boundary layer. You can think of it like friction, slowing down the airflow at the edges of the chimney, while the air in the center of the outlet moves more quickly. The air in between these points flows with a linear speed gradient, but the air's momentum causes the smoke to form a ring after it leaves the orifice.
Next, I had to determine the material I wanted to work with. I considered various plastics, allowing me to 3D print the device, but incense can reach temperatures of 250-300deg Celsius when burning, which is far hotter than most thermoplastics can withstand before melting. I considered thermoset polymers, like resins, which would not melt at high temperatures, but I did not have access to large enough SLA 3D printers at the time to make this a realistic option. Later, I revisited this project and 3D printed a functioning train out of a marble-like material. Out of simplicity, I elected to make the train out of hardwood. This material is rigid and can maintain fine details, but was also easy to work with using the fabrication technology I had access to. Further, this allowed me to keep the train remarkably simple, using only two components for the body. I also had freedom for various different types of wood, which would give me control of how the final product looked. Lastly, most hardwoods can withstand temperatures of up to 300 degrees without catching fire, but I played it safe and added several layers of flameproof chemical coatings to the inner surfaces.
I manufactured most parts of the train using my home CNC router. During the pandemic, I bought a Shapeoko 3 XL, a desktop CNC router capable of cutting wood, plastics, and aluminum. With this machine, I could simply feed in instructions and let a robot take care of the precise manufacturing needed to bring the train to life. I cut out each half of the train separately, and then planned to glue the two halves together using non-flammable wood glue. Each half of the train required two operations, one to hollow out the inside and one to bring the outside shape into the form factor of a train. It was crucial that the two halves of the train were precisely aligned with one another; if not, there would be no way to guarantee concentricity of the inner profiles with the outer profiles. I devised several jigs and work holding solutions to ensure that the inside and outside cut operations were aligned. I machined the train in several steps; first, roughing passes removed the majority of the way stock, and then final passes brought the profile to the final dimensions and finish I had hoped for.


I also fabricated the plunger mechanism, situated between the two halves of the train. For the first functioning model of the train, this was permanently fixed within the two wooden halves of the train, however, later designs allow the plunger mechanism to be removable and replaceable in the event of damage or jamming.
Finally I was ready to assemble the two halves of the train. I spread a thin layer of wood glue on each of the mating surfaces and clamped them together, careful that no glue seeped into the seams where air would need to flow. If glue got into these gaps, it could alter the air flow and disturb the shape of smoke rings produced.

After the glue was dry and in one piece, I coated the outside with an oil-based Polyurethane spray, which brings out the natural color of the wood and has natural flame-resistant properties. I sprayed the inside with flame resistant spray to even further reduce the risk of fire.
Finally, I had the train assembled. It was time to test it out and start making some rings.
A video of the train blowing smoke rings:

Several months later, I 3D printed a new version of this train in one part, using a Formlabs Form3L and Rigid 10k resin. Rigid 10k resin is a glass bead reinforced thermoset photopolymer resin with incredible material properties. It has a surface finish similar to marble, incredible stiffness, and great resistance to high temperatures.
Overall, this product came out exactly how I envisioned. I was impressed by the quality of rings this train produced, and by the overall appearance of the train. The end result stimulates the user's senses of sight, smell, and touch, creating a memorable and satisfying user experience. However, as happy as I am with the end result of this device, there are several design changes I would make if I were to design another version of this train.
Over many months of use, the wooden grain structure of the wood experienced discoloration from exposure to the smoke. Initially, this discoloration was only on the inside of the smokestack, but after many uses the capillary action of the wood's grain structure made this discoloration visible from the exterior. Additionally, I would increase the radius of curvature of the fillet connecting the smallest smokestack to the train body. The combined effect of the capillary action within the wood as well as the repeated thermal expansion made this small radius act as a stress concentration area, and the wood cracked after many hundreds of uses. Several potential solutions to this include increasing the layers of polyurethane coating, forming a smoke-tight coating that would not allow degradation, or shifting to include a metallic smokestack packaged within the train. A metal smokestack would be more resilient to the heat, but would expand significantly more as it gets hot, which would require additional engineering design to ensure that the train does not crack under this loading. I would additionally change the aesthetics of the train by painting it to resemble a steam locomotive, rather than maintaining the natural wooden exterior.
I am considering selling these devices, so please don't be afraid to reach out if you would like one for yourself, or if you have any questions or comments about its' design. Thank you for reading, and feel free to check out some of my other projects through the portfolio link below!